
 What you’ll need
You will need the following components and tools to complete this install:
- Replacement screen
- Phillips head screwdriver
- Small flat head screwdriver (2-3mm)
How to install
Follow the instructions below to complete the installation:
- Turn off the entire unit at the mains power
- Open the unit using the terminal key
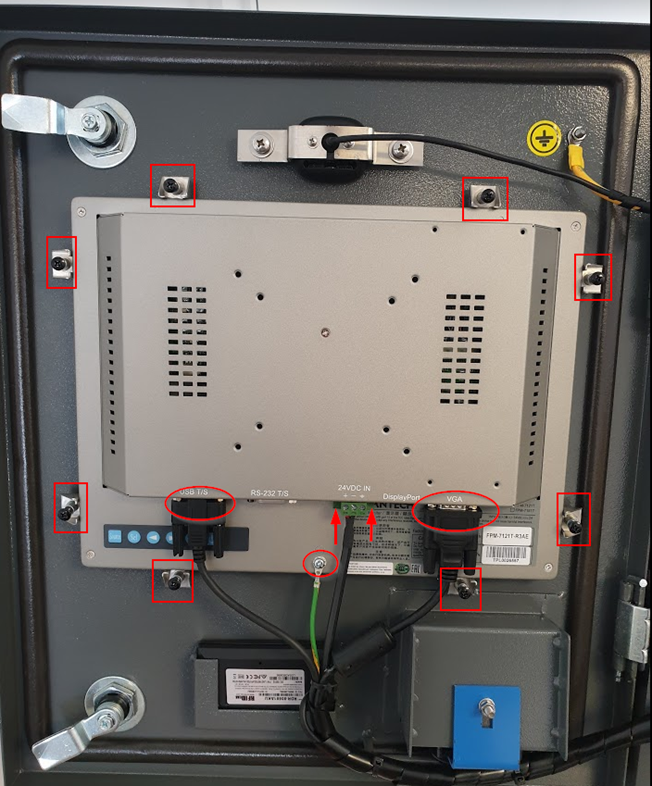
- Remove all connections to the screen as circled in the image on the next page. For the USB T/S and VGA port you will need to unscrew them at each side first. Please note you may have a connection to the DisplayPort instead of the VGA cable - all you need to do is ensure that everything is removed from the screen.
- When removing the 24VDC IN cable, ensure you unscrew it from the bottom screws as indicated with the arrows in the image. Don't remove the red and black cables from the green connector plug. You'll need a small flathead screwdriver for this.
- Using a Phillips head screwdriver, unscrew the mounts outlined with squares shown in the image. Don't lose these as they will need to be used with the new screen. Note how the screw pushes against the cabinet to hold the screen securely in place.
- Remove the screen through the front of the cabinet.
- Insert the new screen with the mounting brackets attached and plug all the leads back in, ensuring everything is tight and secure. Refer to the image if you are unsure where something needs to go.
- Close and lock the terminal and turn the power back on.
If you have any issues, please email service@damstratechnology.com for assistance. Please provide a detailed description of the trouble you’re having and any supporting photos that may be helpful.
What to do with the replaced components?
Please arrange to ship the replaced components to:
Damstra Technology
Unit 3/74 Mustang Drive,
Rutherford NSW, 2320
Ph: 1300 722 801

Comments
0 comments
Please sign in to leave a comment.